

Gathering Media Guide Content
It is important to plan out the content you will be putting in your media guide before trying to design it. The most important things to include are varsity and sub-varsity rosters, coach list, teams photos/headshots and game schedules. To elevate your media guide more personalized content can be included such as senior spotlights or additional photo galleries. Photo content will enhance your media guide but make sure the photos are high quality .JPEGs and not blurry or pixelated. Utilizing a photographer is best practice but iPhone photos can work too. Because you will have content coming in from various people it is important to use a file sharing service like Google Drive, OneDrive or Dropbox. Make sure to stay organized with all of the content files by organizing them in labeled folders.
Must Have Content Checklist
Before even beginning the design work on your media guide organization and collection of content is necessary. This will make the design process less daunting and will give you a better idea at what is going to be in your media guide. It’s easier to gather all the content together in one place and then develop a page plan.
You may be wondering what kind of things should I even put into a media guide? To keep things simple here is our MUST HAVE content for any media guide. This content will ensure that your media guide is engaging, informative and actually elevates your program. Start with these 6 things:
Rosters - You will need to get the varsity roster from the coach or assistant coach. The team is required to have a roster for the season; this is nonnegotiable. You may have to wait until preseason is over and teams have been finalized but this should be top priority. Roster should include at the very least a player’s name, jersey number, class, position. Hometown, weight, height is fun to include if information is available.
Pro Tip - ensure that a few players or parents have proof read the roster names as you can’t always trust coaches to spell every name correctly.
Coach List/Bios - Coaches should be featured in the media guide for all the time and effort they put into the program. While they may not want to write up a bio, they at least will need their name and title in the media guide. Bonus points if you can get each coach to submit 2-3 sentence bio about themselves and how long they’ve been with the program.
Game Schedule - Game times and dates may change but having a tentative game schedule in your media guide is vital. Most fans, parents and spectators will want to see who the team is playing and when. The more people that know when the games are, the more people will come. Game schedules are usually found on the school athletics website or team’s website.
Traditions or Team Values - Every program is unique and operates under different beliefs and motivations. What makes your program different from your competitors are the traditions and values your program embodies. Celebrate those mottos and traditions by dedicating a page or two on why they are important to your program.
Pro Tip - ask your head coach to do a small write up on these team values or traditions as they are the ones establishing and enforcing these values.
Headshots or Team Photos - Parents like to SEE their child in the media guide. Words are great but photos are more engaging and help place a name to a face. If possible include a team photo labeled with names. Headshots are also great as they allow every player to be seen. *Pro-tip Place the headshots in the roster information to create a comprehensive and engaging roster where fans can properly place a face to a name.
Pro Tip - place the headshots in the roster information to create a comprehensive and engaging roster where fans can properly place a face to a name.
Sub-Varsity Content - If your program has sub-varsity teams it is imperative that you include those rosters and schedules as well. Your varsity team is just one piece of the entire program. By including those sub-varsity players you allow everyone (players and parents) to feel like a part of the program. The more people that have a genuine connection to the program and feel valued, the more buy in you get from players and families. When players are bought into a program it translates to wins and success. When parents are bought into the program, it translates to more volunteers, more donations and a well funded program.
Enhancing Content
The bullet list above is plenty of information to ensure that your media guide is worth the read. If you’re looking to go above and beyond we’ve got some creative ideas to make your media guide special not just for the fans but for the players as well. These may require more effort and planning but are excellent additions that will make your media guide personal.
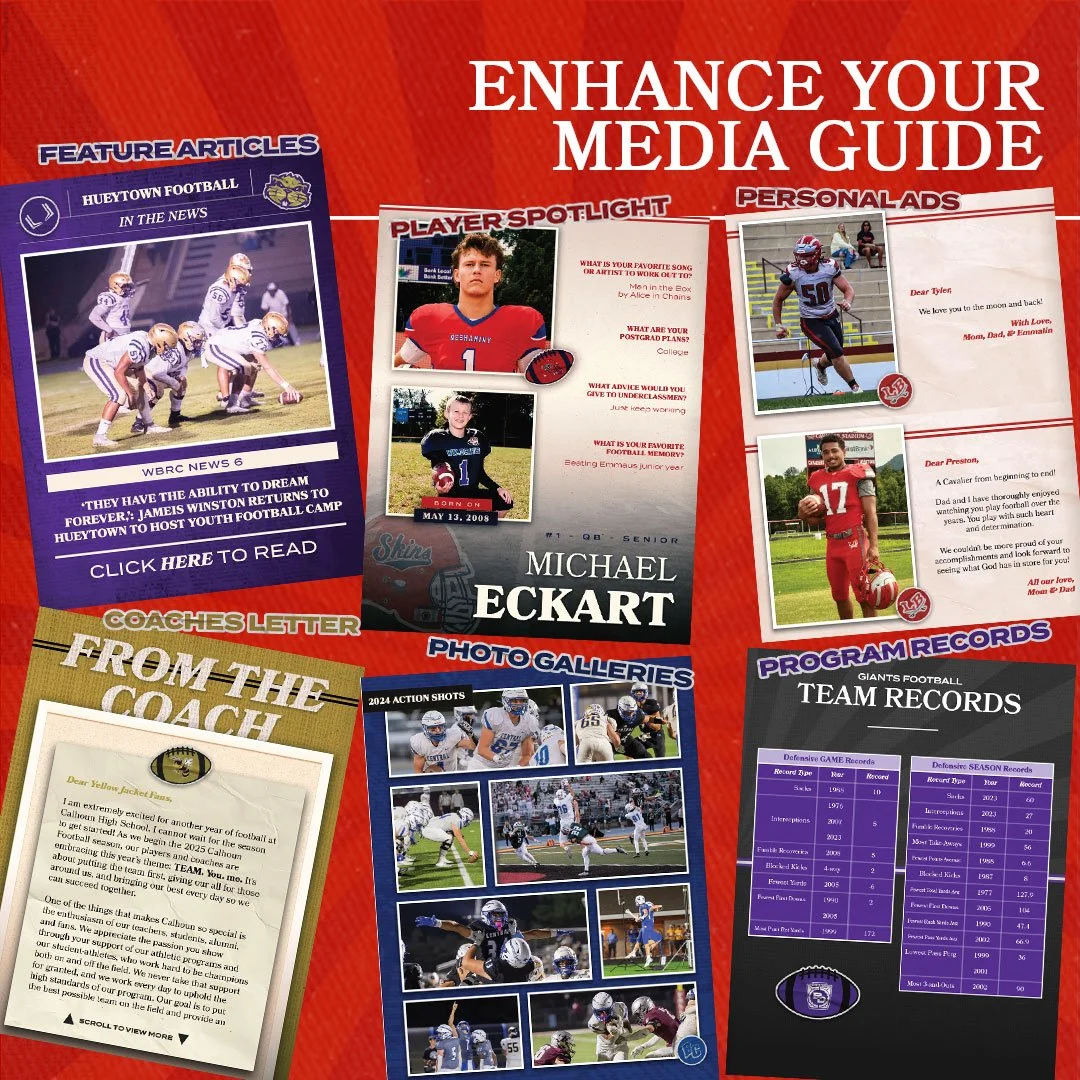
Senior Spotlights - Giving each senior a page in the media guide turns the book from informational to commemorative. Senior spotlights should include a photo of the senior as well as personal information about them like favorite memory from their time with the team, biggest accomplishment, a quote they live by, plans for after graduation, etc. Try to go beyond information you may find just on a roster. Seniors can fill out a quick google doc, excel spreadsheet or an online survey for you to get this information. Give them a hard deadline and 3-4 personal questions to answer about their sports memories and plans for graduation. It requires a little effort on your end with getting photos and answers on each senior but makes for a lasting keepsake that parents and players love.
Feature Articles - Perhaps someone in your program did something notable, or there is a news story worth sharing. Feature articles are a great way to deep dive into aspects of your players, your team and your community that make it unique or special.
Coach’s Letter and Team Motto - If your head coach likes to be involved and would like to address the parents, fans and players reading the media guide, have them write a letter about the upcoming season or the senior class. The coach can include their team focus or motto for the year, goals and what is to come for the season. It’s a great way to get to know the coach or coaches by more than just their bio and name.
Q & A and Fun Facts - Involve the players and do a short Q & A with each player. Everyone can be featured and feel a part of the team. It allows parents and fans to get to know the players outside of just what they do on the field. It also allows those players who may not be stat leaders to get a chance to shine and be highlighted in the media guide. Create a quick google survey and give the players a week to fill in their answers.
Group/Position Photos - Highlight each position group with photos and cut lines of each such as offensive linemen, wide receivers, linebackers, etc. This is a great way to get all players extra recognition and add extra photos in the media guide. Plus, backups and players who aren't featured as much get to see their face on an additional page besides the roster.
Photo Galleries - Some teams like to include photo galleries from preseason events, team camp or 7 on 7 tournaments. This is a great way to capture memories from different events and highlight players in the offseason/preseason.
Personal Ads - Parents really love being able to take out ad space for their player and show their love. Parents can include baby photos and a well wishing message for their player. It’s a great way to collect donations for the team while also giving parents back something in return. Also players get another opportunity to be highlighted.
Program History, Records & Stats - This media guide is not just about this year’s specific team but the program as a whole. Including year to year records and stat leaders is a great way to establish the legacy of your program. It honors the past while celebrating the current team. Most coaches and athletic departments have this information on file. While it’s not vital it elevates the publication from just a throw away game day booklet to a more interesting media guide about the team.
Digital Content - While more advanced digital content can really enhance your media guide. If you are doing just an online PDF media guide you can put links to youtube videos, social media sites and league websites. On interactive PDFs those links are clickable. Fans can be directed on where to find more information on the team or get updates on the schedule. You can also link to google drive folders or smugmug accounts that could be updated with photos from each game. Even with a print media guide QR codes can be put on pages to direct to a website or video. A great addition to senior spotlights is a quick video interview. Put the video on google drive, make the link accessible to anyone and then create a QR code that goes to that video. You can embed lots of online links, websites and content whether you plan to do a PDF media guide or a print one.
High-Quality Photos & Headshots
While the amount of content you put into the media guide is important, the quality of the content is what really makes the media guide. A great media guide has high resolution, clear photos that look great and give a professional feel. Grainy and blurry photos will make your media guide feel cheap and amateur. Prioritizing photo type and quality will make a big difference in your media guide. Team photos, position photos and action photos can really elevate a media guide. Team photos and position photos pair well with the roster. The more photos you have and the more players are seen and celebrated.
Action photos are great for senior spotlights as well as stand alone photo gallery pages. If the media guide is made in the preseason select a few action photos from last year to put in as a photo gallery page. End of season media guide? Include a few photos from every game. Your media guide does not just have to be strictly informational. Action photos are excellent if they are high quality. Meaning they are not blurry, grainy or pixelated. Unfortunately photos taken on an iPhone and mobile phone do not have the speed or strong enough lens to capture good clear photos of players moving. A photographer with some experience in sports photography will be needed to supply action photos. Screenshots of action photos will also not work as the screenshot compresses the image making it lose all of its clarity and sharpness. It’s a good rule of thumb not to include ANY SCREENSHOTS as they may be copyrighted, the quality is incredibly low and the image usually requires cropping out other visuals that were captured on the screen.
Headshots are an important piece of the media guide so we want to make sure everyone is looking their best and the photos come out well. Teams may hire a professional photographer to come and take photos and headshots of all the players. This is one way to ensure the quality as a photographer will take high quality photos and may send/share edited versions. Photographers will send over high resolution .JPEG images that can be directly added to your media guide. If you do not have access or the budget for a photographer you can still ensure great quality headshots. Even with an iPhone you can take great photos at a high resolution. Typically the type of camera isn’t the issue with headshots.

Take the headshots outside without direct sun. A lot of the time headshots are taken in dimly lit or overly lit gyms with artificial lighting. Go outside for natural lighting and a more natural background. Make sure the sun isn't directly behind the players or directly in the eyes of the players. The best time to take the photos would be in the late afternoon after practice or in the early mornings before a preseason practice. These are times when the sun is not super bright so players won’t be squinting and the sun is not directly in the camera.
Players wear the same thing. To create consistency and unity, have the players all wear the same thing. The main focus is the players face, if they all are wearing different outfits it distracts from their face. We recommend being in uniform if possible (for football players don’t need to be in their pads or helmets). Also their arms at their sides or tucked behind their back for all players for consistency.
Frame the player. A headshot is from the waist up and allows you to see the players face and number. You do not need to get their legs and feet in frame. That will just cause more work for you when you need to crop them. Include their waist up with a little room on the sides for their arms. You don’t need to include much of the background.
Experiment with Portrait Mode. Most mobile phone cameras like the iPhone have a portrait mode that puts the subject in focus and will blur the background. This is ideal for headshots as the player will be in focus rather than the background. Try out portrait mode to enhance the quality of the headshots.
Name your files. If the photographer is sending the headshots to the coach first, have the coach label each headshot with number_firstname_lastname. You may not know all of the players and their names on the various teams. Also sometimes jersey numbers change and switch so we recommend the coach labeling headshots rather than parents or booster members. If your coach is not up for the task then you will need to match the roster numbers and names with the number visible on the photo. This is tedious and time consuming but worth it so that you can efficiently drag and drop the headshots into the roster.
JPEG and JPG are Key. JPEG (or JPG) are file extensions that you will see at the end of the file name on your photos (found on computer). These types of photos are best when working with design programs and when working with our template as they are universally accepted. Unfortunately iPhone shoots photos as their own type of photo .HEIC which are not supported by most design programs. So you will have to convert those HEIC files to JPEG. Thankfully that is very easy - open the photo -> go to file -> export and make sure you save the image as a JPEG. If you have a lot of photos to convert you can do it in a batch convert using this application converter (you will have to download this app to do the batch convert.)
File Sharing and Organizing Content
Most likely you will be working on this media guide with at least one other person. It can get overwhelming when you receive texts and emails with various content like photos, word documents, pdfs and more. Keeping track of all the content that is coming in requires a file sharing system. This will allow people to upload specific content into separate folders instead of just dumping it on you or your booster club via several different emails.
Google Drive is a free online storage solution that allows you 15 GB of shared storage. Anyone with the folder link can upload images, documents, pdfs, videos or any other files to your shared folder. This cuts down on the emails and gives you or your photographer an easy way to upload all the photos to one place. If you need more than 15GB you can pay monthly for more storage. It is important to note that anyone uploading to your Google Drive will need a free Google Account or Gmail unless you are on a google workspace account (usually for businesses).
OneDrive is Microsoft’s version of Google Drive and has a free 5GB option if most of your contributors use a Microsoft email. There are other paid options as well like DropBox that will give you a lot more storage. As long as your content contributors have a link to where they can upload it will make your life a lot easier with keeping content organized. Just keep in mind your contributors may need to set up a free account on their end to upload files to your folder link.
Another big way to stay organized is separating the content into separate folders. Do not just have a folder on your desktop or Google drive labeled “Media Guide 2025” and put everything in there. Instead what you can do is make separate sub folders. One way to organize these subfolders is by content type like “varsity headshots” or “JV position photos” this allows your contributors and you to know where to go to submit content as well as download it. Take the few extra minutes to organize your files and folders before you get started so you know exactly what content you’ll be putting into the media guide and where it will be stored.